The SSC2 LED Fog Pocket Kit for the 2019-2023 Dodge Ram 1500 from Diode Dynamics adds four road-legal SSC2 LED fog pods in place of your factory fog lights. This provides a significant increase in light output and adds an aggressive off-road appearance while maintaining road-legal fog lights.
The following installation guide will provide you with detailed instructions on how to install the SSC2 LED Fog Pocket Kit on the 2019-2023 Dodge Ram 1500. Check out our installation video or continue reading for step-by-step instructions below!!
Table of Contents
Installation Video
Installation Tools
- 3/8" Ratchet
- 7mm Socket
- 8mm Socket
- 10mm Socket
- 13mm Socket
- 5/32" Allen Wrench
Mounting Instructions
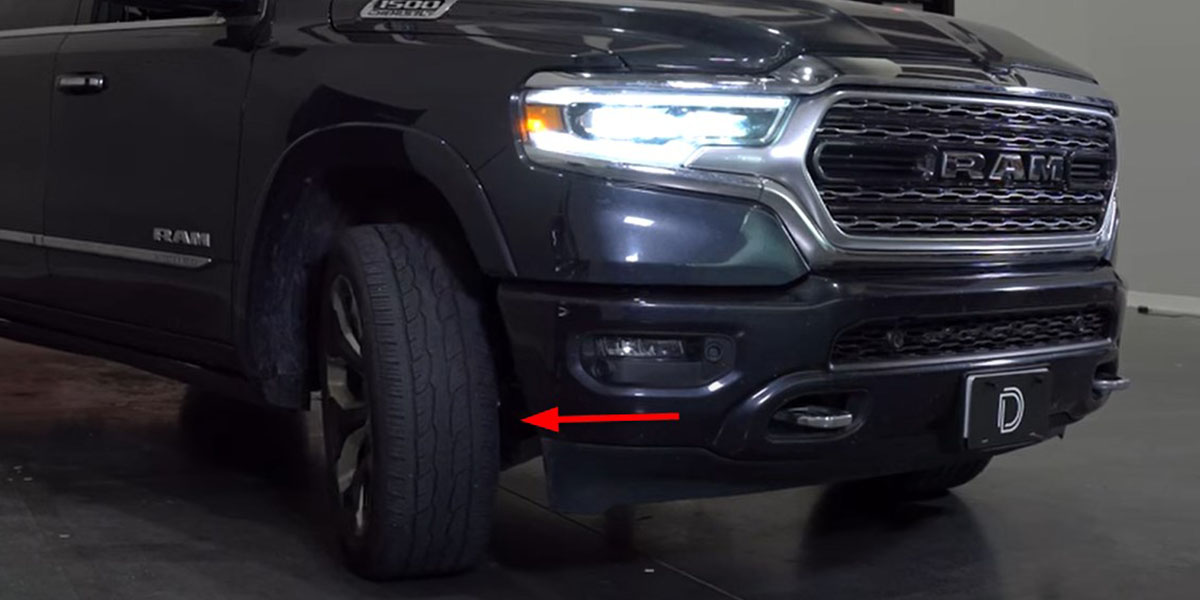
Step 1 - Position Wheels.
Turn the steering wheel to the right to access the fog lamp area from inside the passenger side wheel well.
Step 2 - Remove Inner Fender.
On the passenger side of the vehicle, use an 8mm socket to loosen the two inner fasteners (circled in red) holding the fender liner in place.
Then remove the three outer fasteners (circled in blue).
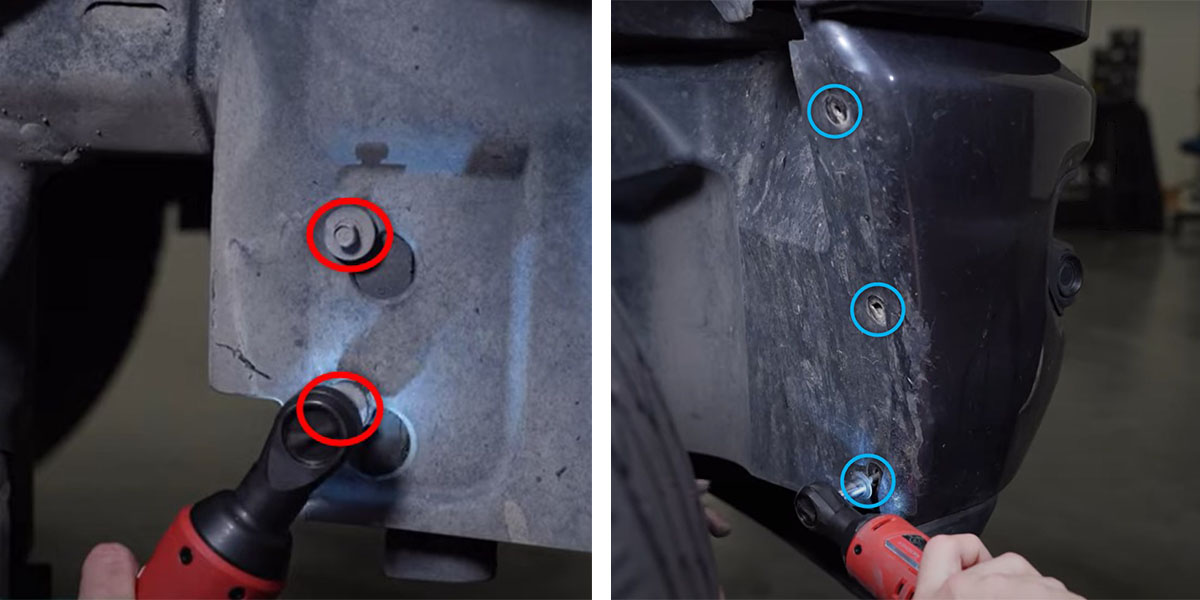
Slide the inner fender well up and to the left, and then pull straight out to remove it.
Step 3 - Disconnect Factory Fog Light.
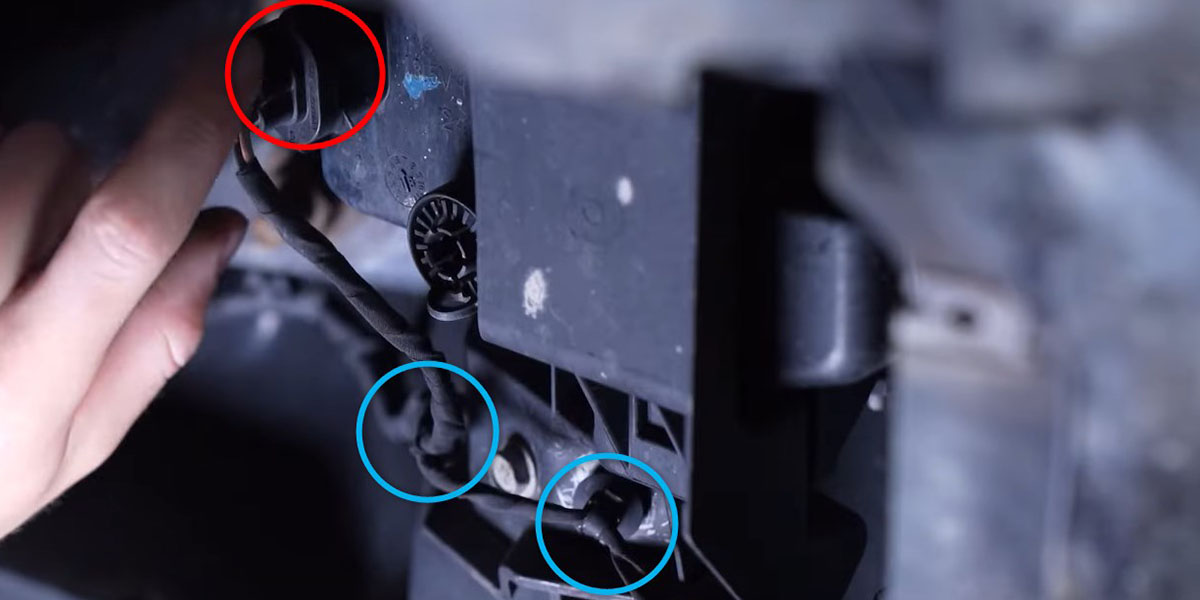
The passenger-side factory fog light will now be accessible.
Unplug the upper connector (circled in red) from the rear of the factory fog light. Then use a trim removal tool to unclip the two tabs (circled in blue) holding the factory harness in place. Secure the factory harness in a safe position, as it will be used later in the installation.
Step 4 - Remove Factory Assembly.
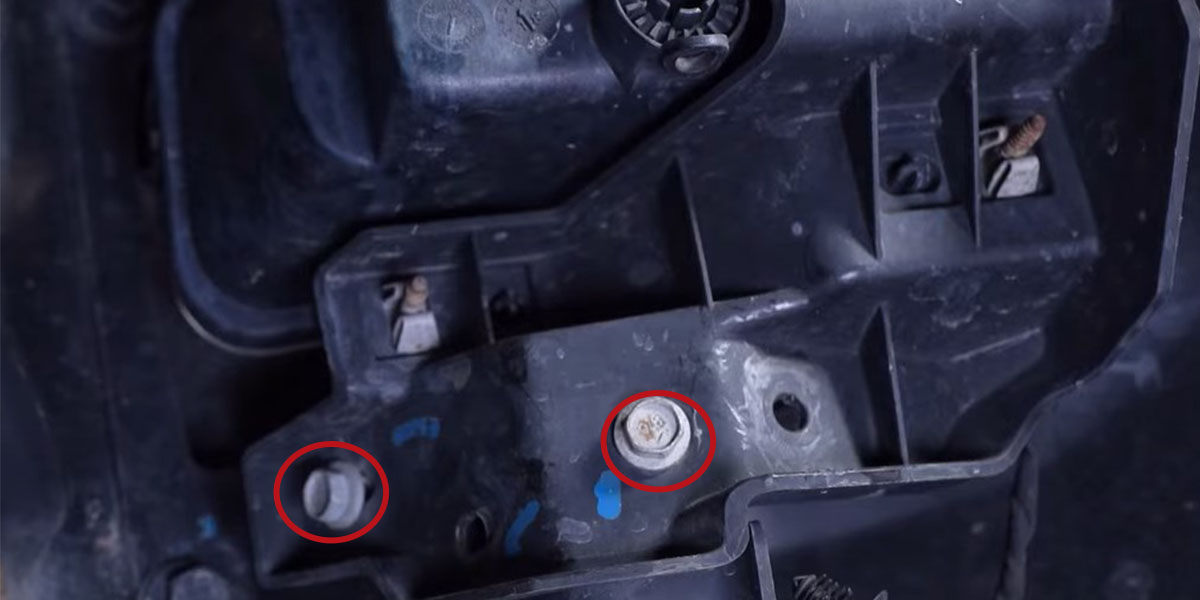
Using a 10mm socket or ratcheting wrench, remove the three top bolts (circled in red) securing the factory fog light assembly in place.
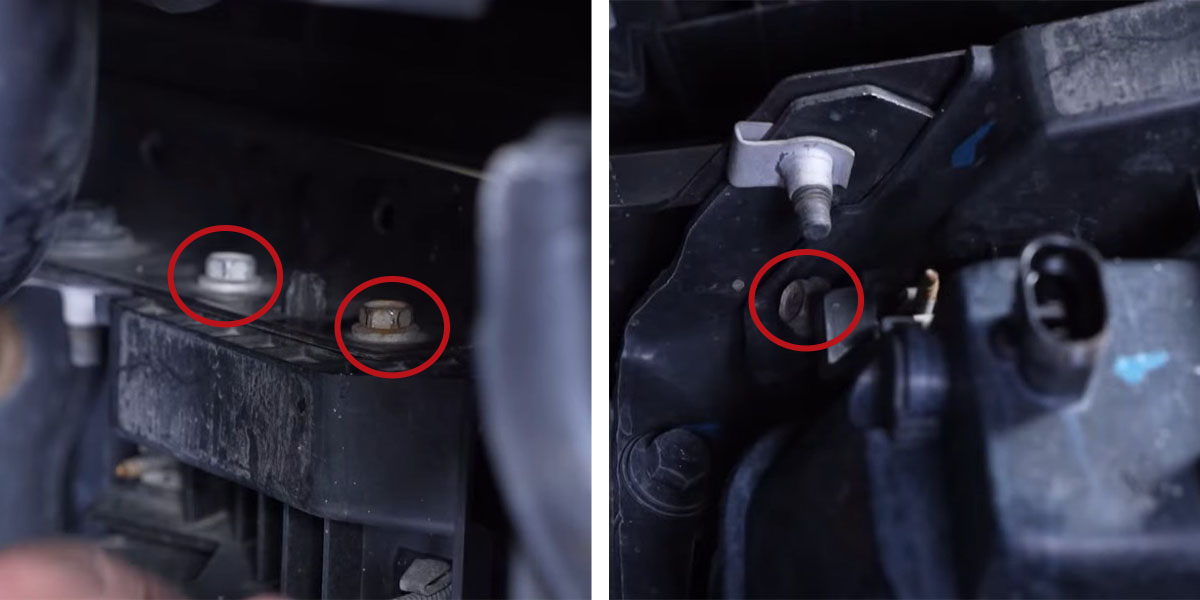
Next, remove the two bottom bolts. Then remove the factory fog lamp and housing assembly by pulling it back.
Step 5 - Remove Factory Light.
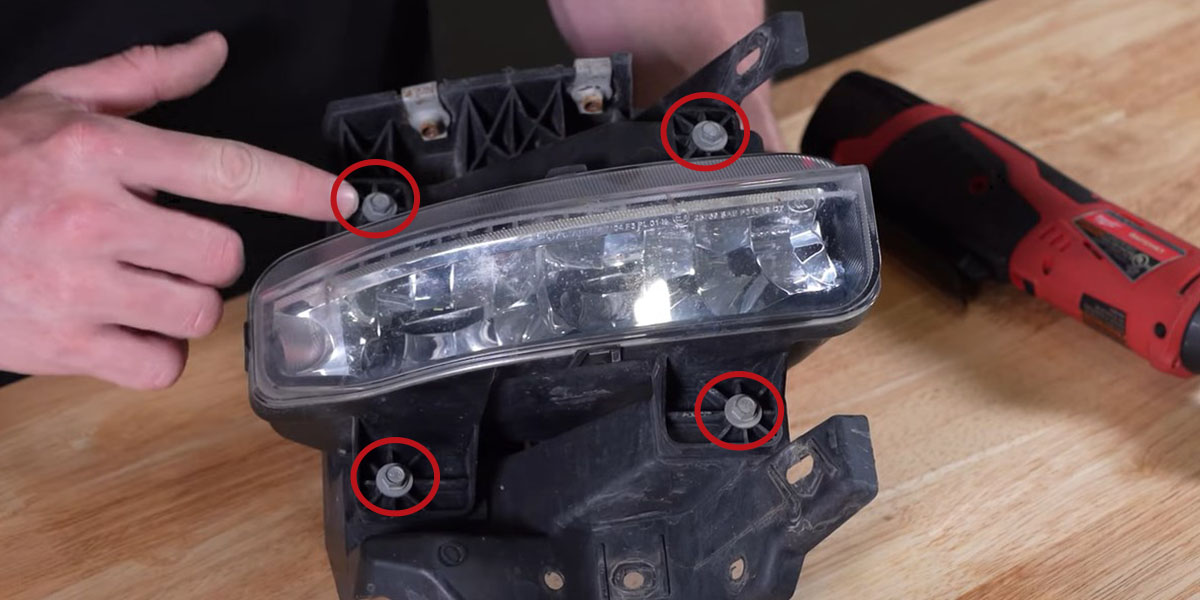
With the factory lamp and housing detached, use a 7mm socket to remove the four bolts holding the factory light to the housing. Then remove the factory light from the housing.
Step 6 - Assemble Pod Lights.
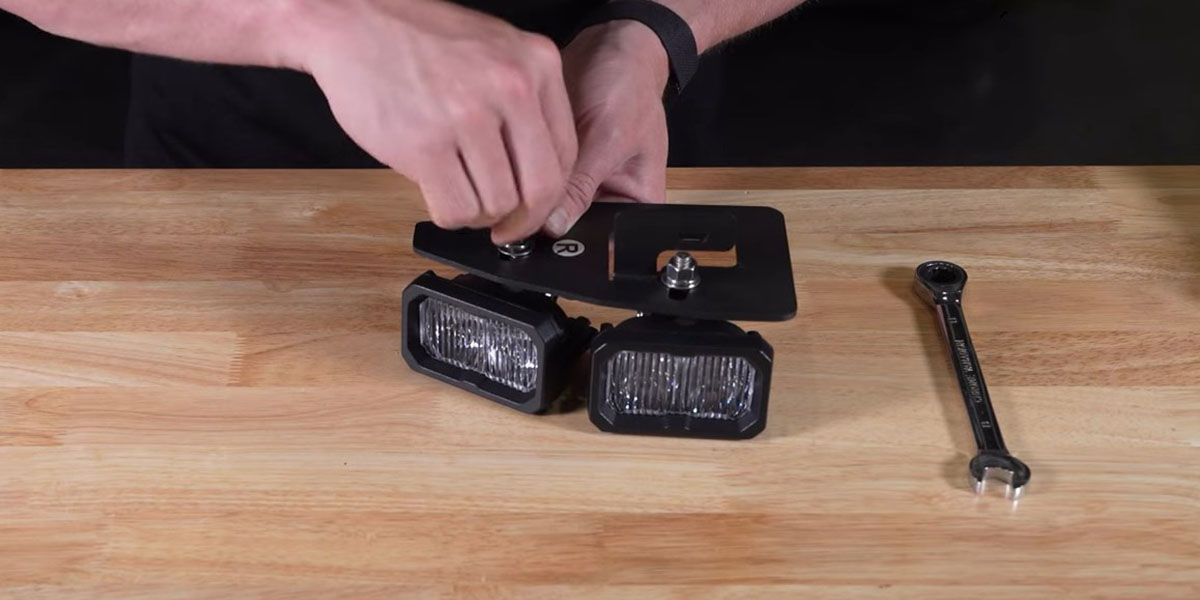
Assemble the two SSC2 LED pod lights onto the Diode Dynamics bracket that has an "R" designation using the included hardware and the instructions found here.
Note: The SSC2 LED pod lights should only be hand-tightened at this time.
Step 7 - Install Splitter Harness.
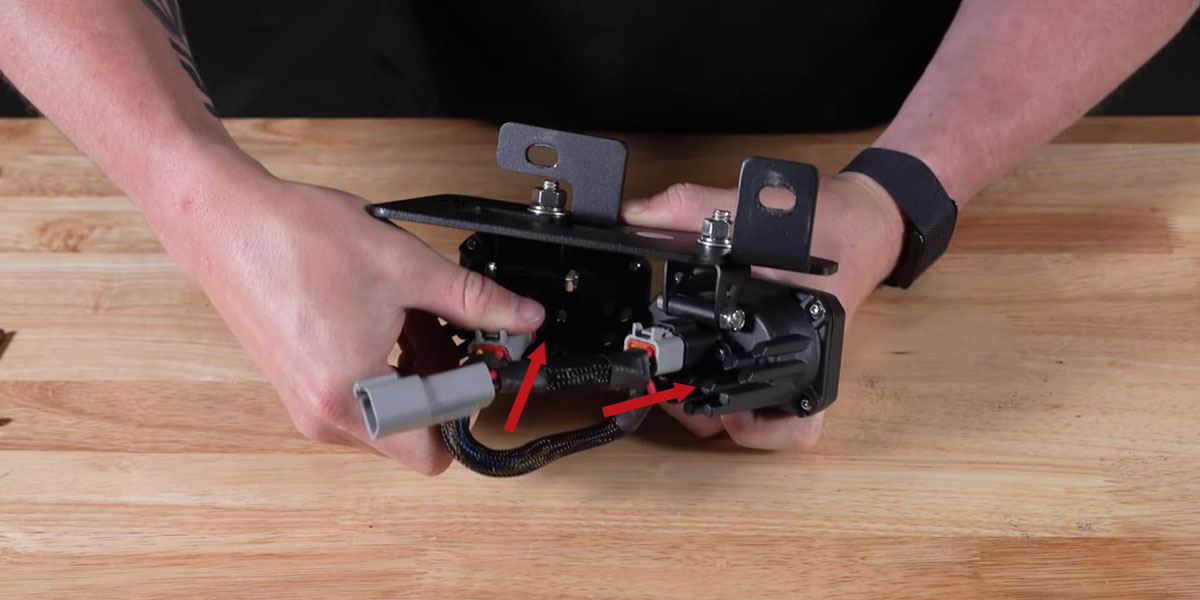
Plug the included splitter harness into the back of each SSC2 LED pod. The shorter side of the splitter should be plugged into the outer pod light.
Step 8 - Attach Bracket to Factory Housing.
Using a 7mm socket or wrench, attach the assembled SSC2 LED fog light bracket onto the factory fog light housing using the top two factory bolts removed in Step 5. The lower two factory bolts are not required for installation.
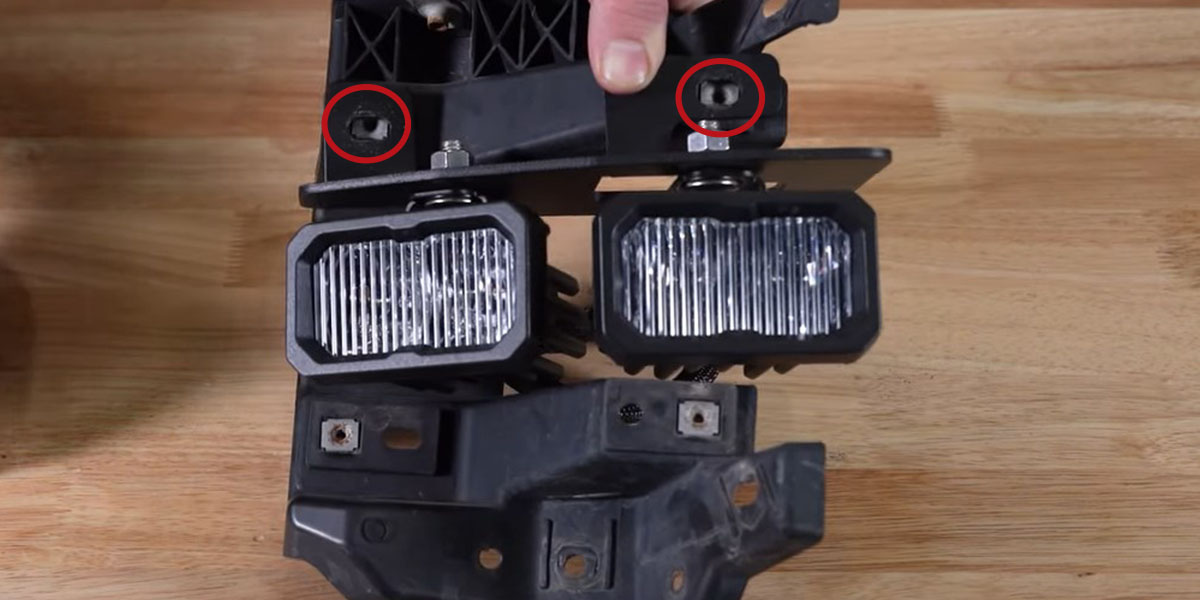
Step 9 - Mount Assembled Housing.
Remount the newly assembled fog light housing onto the passenger side of the bumper using the five 10mm bolts removed in Step 4.
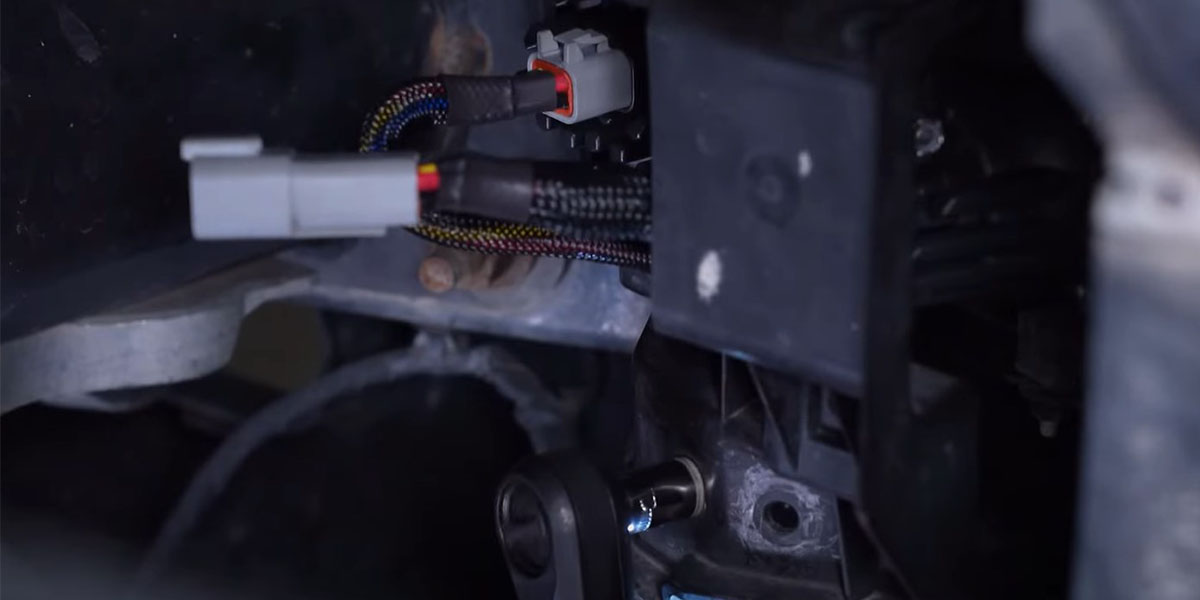
Then replace the two plastic clips removed in Step 3.
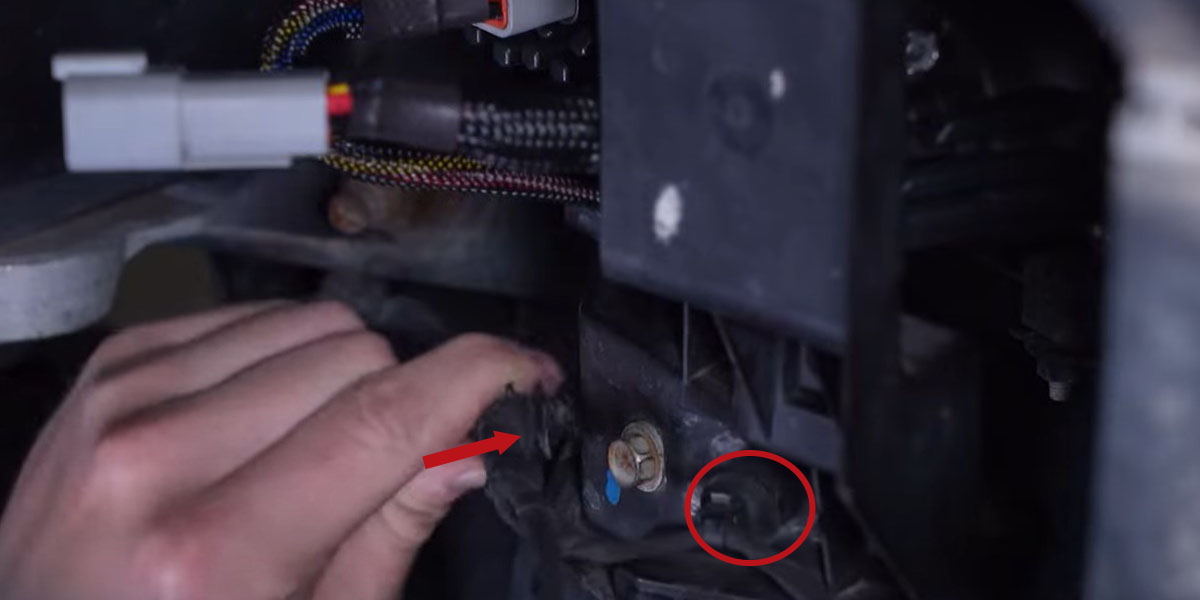
Step 10 - Install on Driver's Side.
Repeat steps 1-9 for the driver's (LH) side.
Note: To begin Step 1 on the driver's side of the vehicle, the steering wheel will need to be turned to the left.
Wiring Instructions
Step 11 - Connect Factory Harness.
Plug one of the included H11 adapter harnesses and plug it into the factory H11 connector. Then connect the other end of the H11 adapter into the SSC2 DT splitter harness.
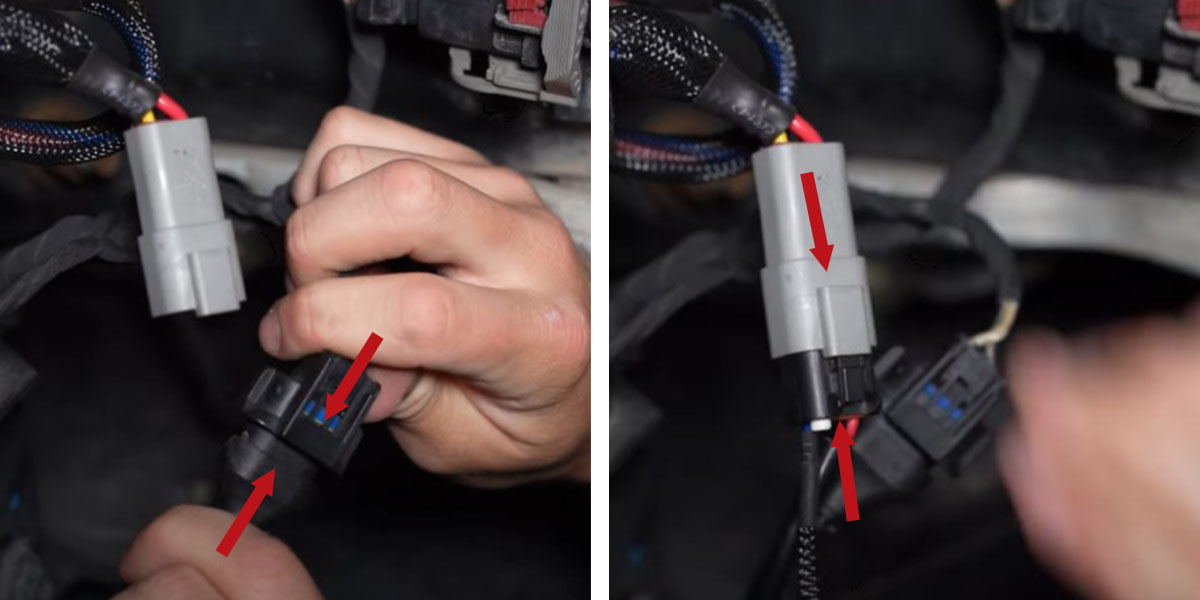
Step 12 - Connect Backlights (Optional).
To enable the backlight function of the SSC2 LED Fog Pocket kit, use the included T-Taps to tap into the parking light wires of the factory headlight.
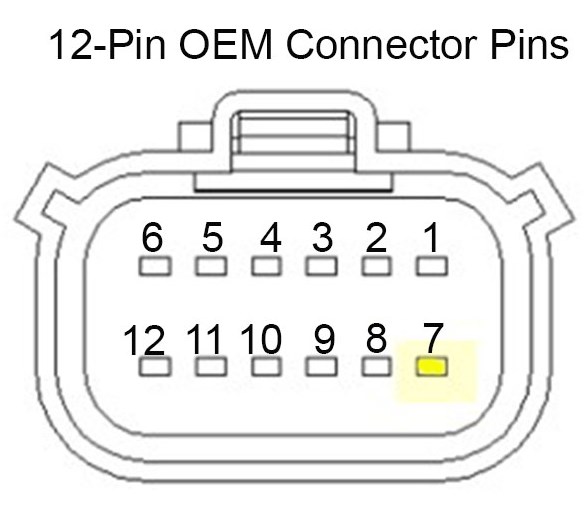
If you are connecting the T-Tap to a 12-pin OEM headlight connector:
On the Passenger side, tap into the Pin 7 tan/orange wire.
On the Driver side, tap into the Pin 7 white/brown wire.
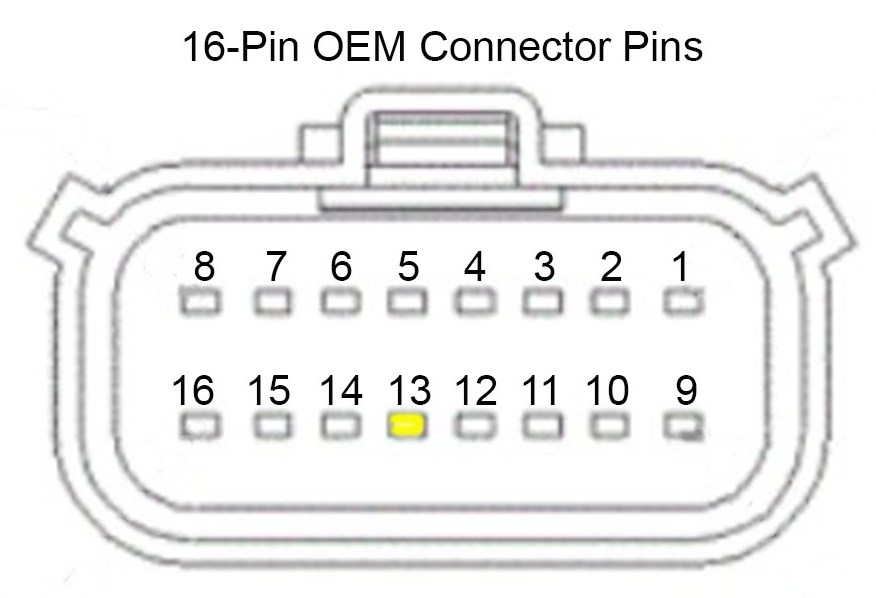
If you are connecting the T-Tap to a 16-pin OEM headlight connector:
On the Passenger side, tap into the Pin 13 white/orange wire.
On the Driver side, tap into the Pin 13 white/brown wire, as shown below.
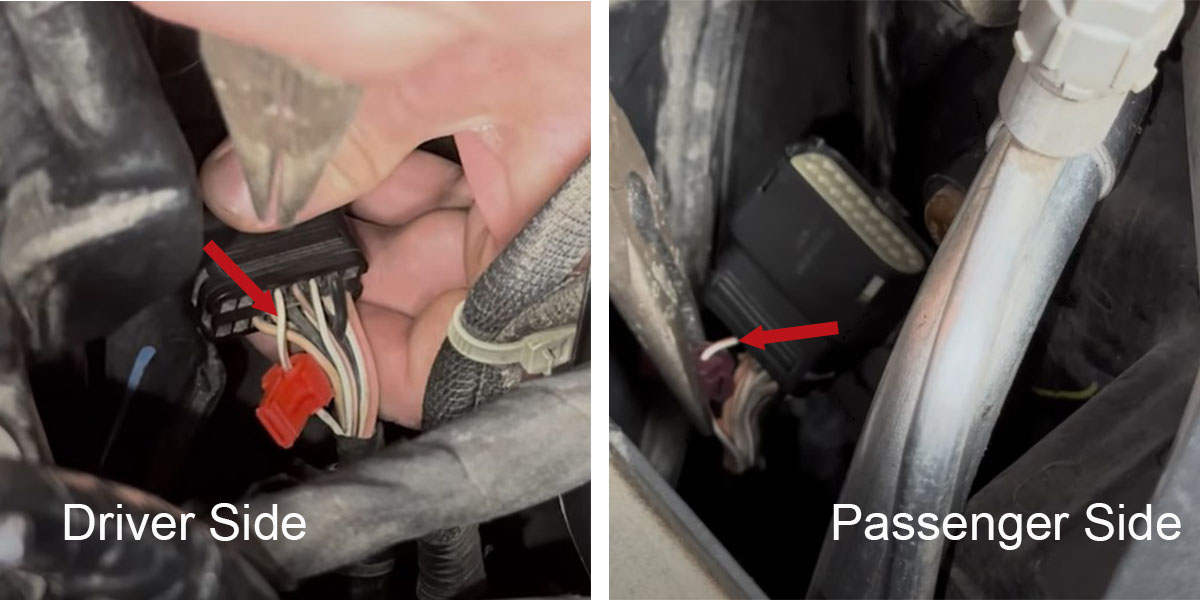
Step 13 - Test Functionality and Aim.
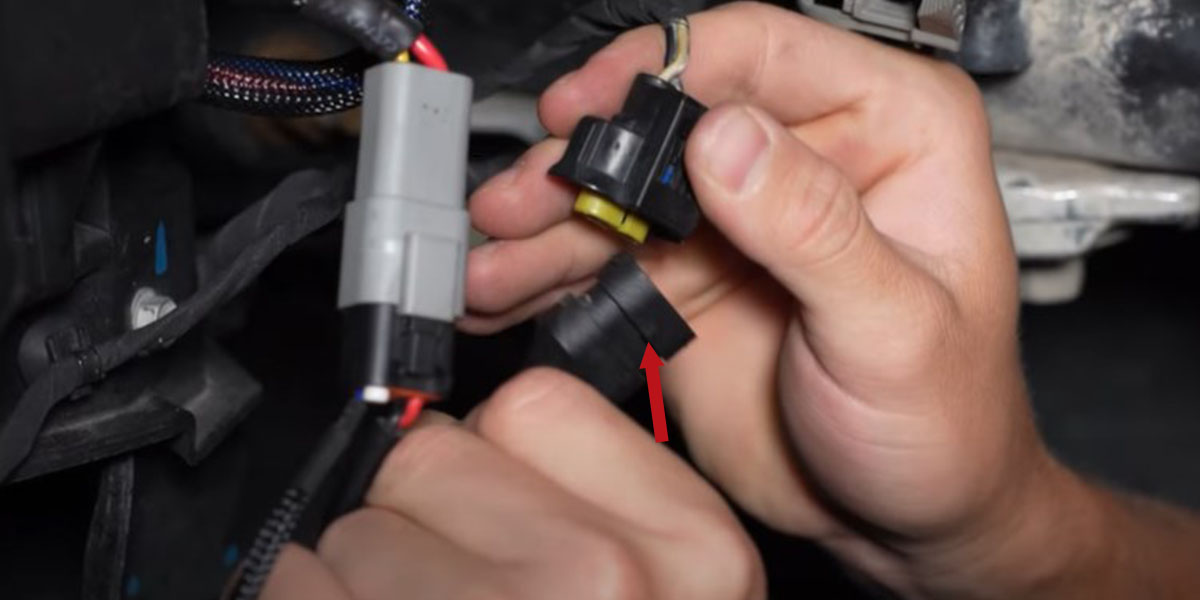
Turn on the lights to test functionality. If the lights don't illuminate, unplug the H11 adapter and flip the connector 180 degrees. Then, follow the aiming instructions listed below to aim your fog lights.
Aiming Instructions
Check out the video below for aiming instructions or keep reading for step-by-step instructions.
Step 14 - Position Vehicle.
Park your vehicle 25 feet away from a wall or garage door on a level surface.
Step 15 - Loosen Allen Bolts.
Loosen the 5/32" Allen bolts on each side of the four SSC2 LED pods, just enough to allow you to adjust the pods.
Step 16 - Find the Mounting Height.
On your vehicle, measure the distance between the ground and the center of your SSC2 LED pods. This is your mounting height.
Step 17 - Mark the Mounting Height.
Mark the mounting height on the wall or garage door using tape.
Step 18 - Mark Cutoff Line.
Add another piece of tape four inches below the mounting height. This is your fog light cutoff line.
Step 19 - Aim Pods.
Aim your SSC2 LED pods on each side so that the top of the beam pattern is on the cutoff line mark.
Step 20 - Complete Aiming.
Tighten the 5/32" Allen bolts back down to complete the installation. Do not overtighten or use power tools to torque them down.

Step 21 - Tighten Hardware.
Using a 13mm socket or wrench, final tighten the four separate light mounting bolts/nuts on both the driver and passenger side light assemblies, along with the four 5/32" Allen nuts.
Step 22 - Reinstall Inner Fenders.
Using an 8 and 10mm socket, reinstall the 5 inner fender well fasteners removed in Step 2 on both the driver and passenger side to complete the installation.
Questions About the Installation?
If you have any questions or issues installing the SSC2 LED Fog Pocket Kit in your 2019-2023 Ram 1500, please contact us for further information.
Where Can I Buy an SSC2 LED Fog Pocket Kit for the 2019-2023 Ram 1500?
If you’re ready to upgrade your 2019-2023 Ram 1500 with an SSC2 LED Fog Pocket Kit, you can purchase one by clicking here or by using our dealer locator to find a dealer near you.
Want to know more about Diode Dynamics products? Visit DiodeDynamics.com and subscribe to our newsletter for new product releases and more!
This Installation Guide is for the following SKUs: DD7621, DD7622, DD7623


Share This Post